I was recently reading an interesting question by a user. Given a date/time value and a number of hours, add the number of hours to the date, but considering some constraints related to working hours:
- The working hours are 09:00-17:00
- Non-working days do not count
Computing the value requires some long (not complex, just long) DAX code which is unlikely to produce good performance on large datasets. Therefore, it is the kind of calculation that is better suited for pre-computation before the data is loaded in Power BI.
Nevertheless, I love these DAX puzzles, so I wrote a solution which is worth sharing because it makes use of a DAX feature that is not very well known.
A DAX DateTime column is just a decimal number. The integer part of the number represents the number of days after 30 December 1899. The decimal part represents the fraction of the day. Therefore, one hour in DAX is the result of 1/24 (0.04167). This representation of dates makes it very easy to perform calculations with dates.
For example, if you need to compute a date adding a given number of hours, the expression is just StartingDate + NumberOfHours * ( 1 / 24 ). Similarly, the difference in days between two dates is as easy as a subtracting one date from the other.
This feature of DateTime columns is useful to perform calculations over date and time, as I am about to show with the DAX code.
Now, let’s get back to the problem: we have a starting date/time and a number of hours to add. These hours need to be allocated only on working time. The algorithm can be outlined as follows:
- Compute the number of hours that can be allocated on the first day. If the starting time is 15:00 (or 3:00 PM if you prefer), then there are two hours that are allocated on the first day. These hours need to be removed from the total hours to add.
- The remaining hours, divided by the number of working hours per day, determine the number of working days needed to complete the addition.
- If the result of remaining hours divided by the number of working hours per day has a decimal result, then the decimal part is the number of hours to allocate on an additional day.
- At this point, we know how many working days are needed, we need to compute the starting date, plus the number of working days detected. This requires a bit more attention, as described later.
The code that solves the scenario is long, but quite simple. Here I show the full code, then the output of one evaluation, and the remainder of the article is a longer explanation of the different steps.
EVALUATE
    --
    --    This is the starting point: start date and hours to add
    --
    VAR StartingDateTime = DATE ( 2008, 1, 4 ) + TIME ( 7, 0, 0 )
    VAR TimeToAdd = TIME ( 17, 30, 0 )

    --
    --    These are parameters: working time is 09:00 - 17:00
    --
    VAR WorkTimeStart = TIME ( 09, 00, 00 )
    VAR WorkTimeEnd = TIME ( 17, 00, 00 )
    VAR WorkingHours =  ( WorkTimeEnd - WorkTimeStart )

    --
    --    Split StartingDateTime in two parts: date and time
    --
    VAR StartingTime = StartingDateTime - TRUNC ( StartingDateTime )
    VAR StartingDate = StartingDateTime - StartingTime

    --
    --    Check how many hours in the first day, how many hours in the last
    --  day and how many working days are needed in between
    --
    VAR FirstDayHours =
        MIN (
            MIN ( WorkTimeEnd - StartingTime, WorkingHours ),
            TimeToAdd
        )
    VAR RemainingHours = TimeToAdd - FirstDayHours
    VAR RemainingDays = QUOTIENT ( RemainingHours, WorkingHours )
    VAR LastDayHours = RemainingHours - ( RemainingDays * WorkingHours )

    --
    --  Here we compute the end date, by taking the current working day
    --  number and searching for the date which happens to be on the
    --  starting working day number + the number of working days
    --
    VAR StartingDayNumber =
        LOOKUPVALUE (
            'Date'[WorkingDayNumber],
            'Date'[Date], StartingDate
        )
    VAR LastWorkingDayNumber =
        StartingDayNumber + RemainingDays
        + 1 * ( LastDayHours > 0 )
    VAR LastDay =
        LOOKUPVALUE (
            'Date'[Date],
            'Date'[WorkingDayNumber], LastWorkingDayNumber
        )

    --
    --    Here we go, this is the result
    --
    VAR Result = LastDay + WorkTimeStart + LastDayHours

    VAR Output =
    {
        ( "", "", "" ),
        ( "Starting date/time: ", StartingDateTime, "This is the starting date/time" ),
        ( "TimeToAdd", TimeToAdd, "Note this is a DateTime" ),
        ( "WorkingHours", WorkingHours, "Again, a date time storing only a time" ),
        ( "FirstDayHours", FirstDayHours, "Hours worked on the first day" ),
        ( "RemainingHours", RemainingHours, "Hours remaining, after the first day" ),
        ( "RemainingDays", RemainingDays, "Number of days remaining, after the first day" ),
        ( "LastDayHours", LastDayHours, "Hours to work on the last day" ),
        ( "StartingDayNumber", StartingDayNumber, "Working day number of the first day" ),
        ( "LastWorkingDayNumber", LastWorkingDayNumber, "Working day number of the last day" ),
        ( "LastDay", LastDay, "Day when the work finishes" ),
        ( "Result", Result, "Date/time when the work finishes" )
    }
RETURN
    SELECTCOLUMNS (
        FILTER ( Output, [Value1] <> "" ),
        "Variable", [Value1],
        "Value", [Value2],
        "Notes", [Value3]
    )
If you run this code the output contains the values of the different variables. For debugging and learning purposes, it proves priceless:
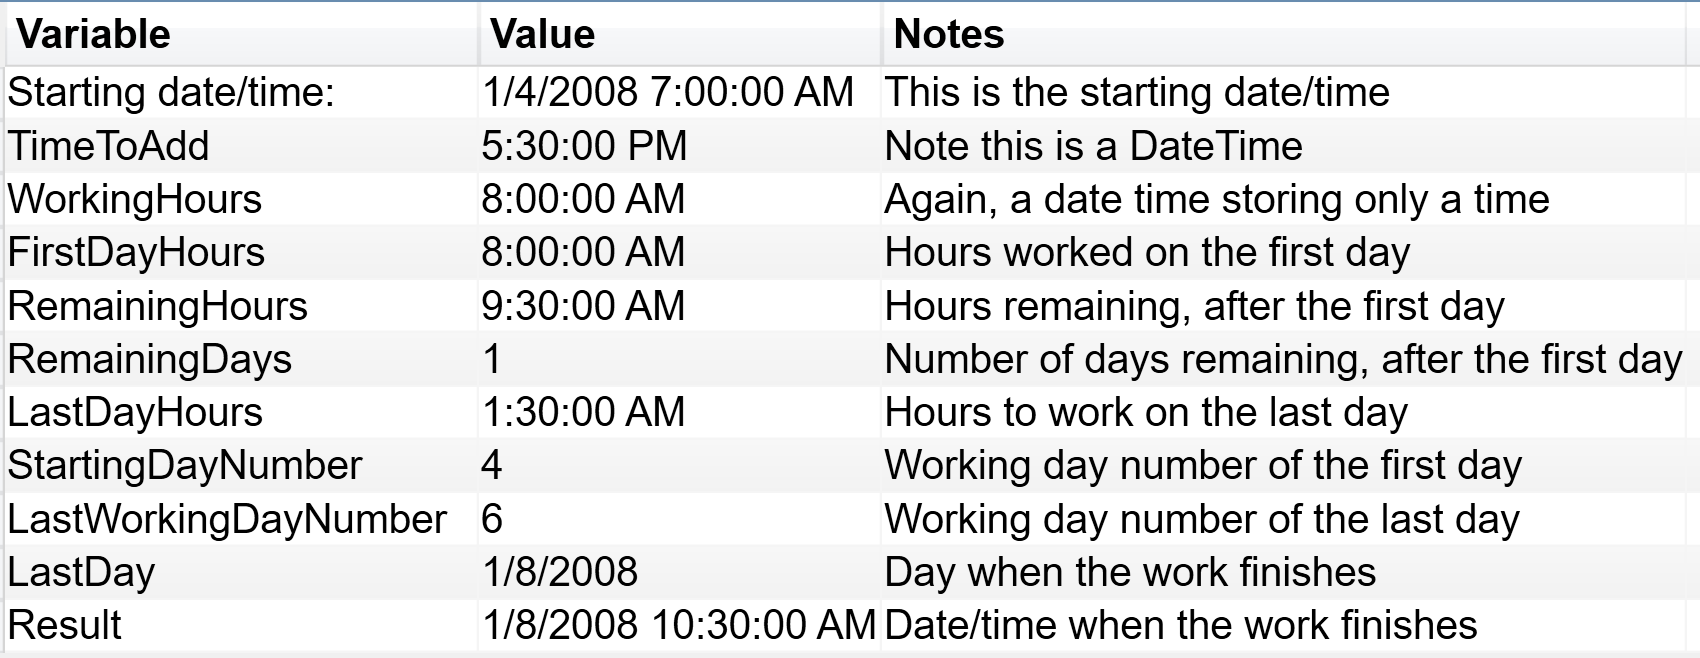
- The first two variables (lines 5,6) represent the input to the algorithm. Similarly, the third (WorkingHours, lines 11-13) is a parameter of the algorithm, which represents the number of working hours in a day computed by subtracting from the end time the start time. It is worth noting that the content of WorkingHours is not the integer 8 but, rather, the result of (1 / 24) * 8. In other words, it is eight hours in the DateTime DAX representation.
- The next step (line 25) is to compute the number of hours used for the first day. The two MIN functions are used because the start time might be earlier than the work start time. The number of hours used for the first day need to be subtracted from the total hours. In the example, the start hour is 07:00 AM. Consequently, the first day the entire 8 hours are used. At this point (line 30), the algorithm knows how many hours are left, after the end of the first day. This number is RemainingHours. As you see, RemainingHours being a DateTime, shows 9:30 AM which is the DAX way or representing 9.5 hours (17.5 minus 8 results in 9.5 hours left).
- Now (line 31) we need to discover how many full working days we need. The quotient of 9.5 and 8 returns this result; in our example it is 1. The remainder of the division (line 32) is the number of hours that will be needed on the last day. In our example, 1.5 hours are needed on a last, additional day.
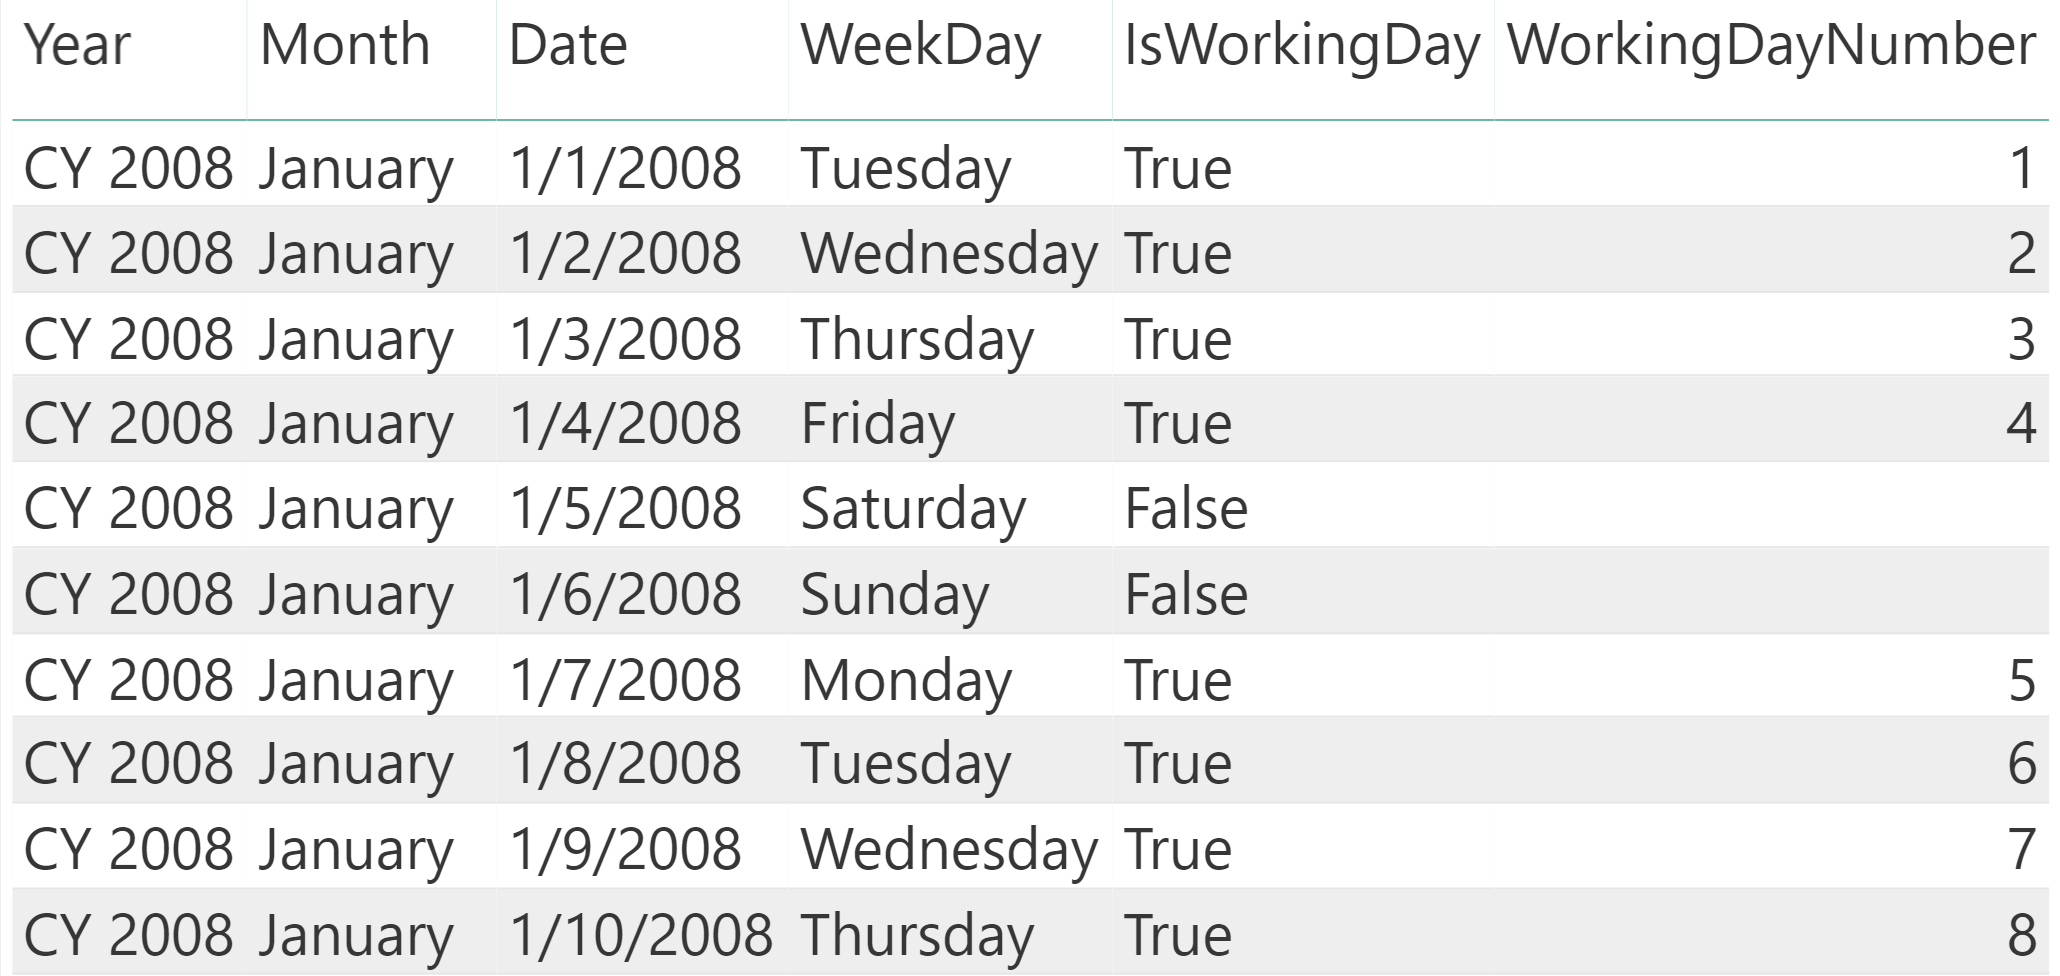
Time for a first recap. After some mathematical calculation we discovered that we need 8 hours on the first day, one second full day and 1.5 hours on a third day. Therefore, we need 2 days after the first one. These are 2 working days. In the example, I chose the January 4, 2008, which happens to be in Friday. Therefore, in order to add 2 working days to January 4, we need to skip January 5 (Saturday) and January 6 (Sunday) and we need to end up on January 8 (Tuesday).
To solve this, I added a new calculated column to the Date table that increases by one every working day and produces a blank during non-working days:
The code of this column uses a simple RANKX to produce its result:
Date[WorkingDayNumber] =
IF (
    [IsWorkingDay],
    RANKX (
        FILTER (
            Dates,
            [IsWorkingDay] = TRUE
        ),
        [Date],
        ,
        ASC
    )
)
The WorkingDayNumber is useful because you can find Tuesday by adding 2 to the WorkingDayNumber of January 4. Generally speaking, math on WorkingDayNumber produces correct calculations considering only working days. For example, you can subtract two WorkingDayNumbers to obtain the difference in working days between any two dates.
Therefore, the last piece of code (lines 39-51) are two LOOKUPVALUE functions. The first LOOKUPVALUE retrieves the WorkingDayNumber of the first date. The second LOOKUPVALUE retrieves the date of a row that has a WorkingDayNumber of the starting working day number plus the number of days needed. The only noticeable thing is that in the calculation of LastWorkingDayNumber we need to consider that if there are no hours to use on the last day, then we do not need to consider the last additional day. This happens in the very special case when LastDayHours equals to zero.
At this point (line 56), the result is computed. The remainder of the DAX code (lines 58-79) is just a dummy table with the content of all the relevant variables used by the algorithm that I used only for debugging and to help you understanding the flow.
As you see, by leveraging a calculated column for the working day number and some simple mathematical operations on the structure of DateTime columns, a complex calculation turns out to have a simple solution using DAX.
With all that said, if I had to solve the problem, I rather use M or SQL to compute these values, and only use their results in DAX. However, you might have a simulation report where people are dynamically allocated to tasks and there is the need to compute the date when a project is likely to finish, depending on the number of people allocated to the project. In such a scenario, these calculations prove to be extremely useful.
You can download the example file and play with the query in DAX Studio to get a better picture of it. Keep in mind, this is not a pattern, it is just an example that is not optimized use in production.
Returns the smallest value in a column, or the smaller value between two scalar expressions. Ignores logical values. Strings are compared according to alphabetical order.
MIN ( <ColumnNameOrScalar1> [, <Scalar2>] )
Returns the rank of an expression evaluated in the current context in the list of values for the expression evaluated for each row in the specified table.
RANKX ( <Table>, <Expression> [, <Value>] [, <Order>] [, <Ties>] )
Retrieves a value from a table.
LOOKUPVALUE ( <Result_ColumnName>, <Search_ColumnName>, <Search_Value> [, <Search_ColumnName>, <Search_Value> [, … ] ] [, <Alternate_Result>] )