 Marco Russo & Alberto Ferrari
Thanks to Bravo for Power BI, creating a Date table and applying time intelligence calculations to existing model measures has never been easier. With a few clicks, the Power BI model gets the required updates, and you can further modify the code generated.
Bravo provides several ready-to-use templates based on the Time Intelligence patterns published on the DAX Patterns website. However, the pattern may not provide all the features required. There could be columns and measures you want to remove, or you might need additional columns or time intelligence calculations that are not part of the template. In that case, you have two options:
- Edit the model after using Bravo and apply the template closest to your requirements. This approach works, but there are two side effects: you must repeat the same changes if you have several Power BI models with the same requirements, and you would lose the changes applied to tables and measures if you rerun Bravo to apply the same template with different parameters. Pro tip: do not change the Date table created by Power BI but add calculated columns instead. Indeed, calculated columns are preserved if you apply the template again whereas the calculated table expression is replaced with the new one.
- Create a custom template for Bravo, and then use your own template for your models!
This article guides you through the second option: the goal is to introduce what a Bravo template is, providing a high-level overview of the tasks required and directing you to the documentation to complete the job.
Introducing Bravo templates
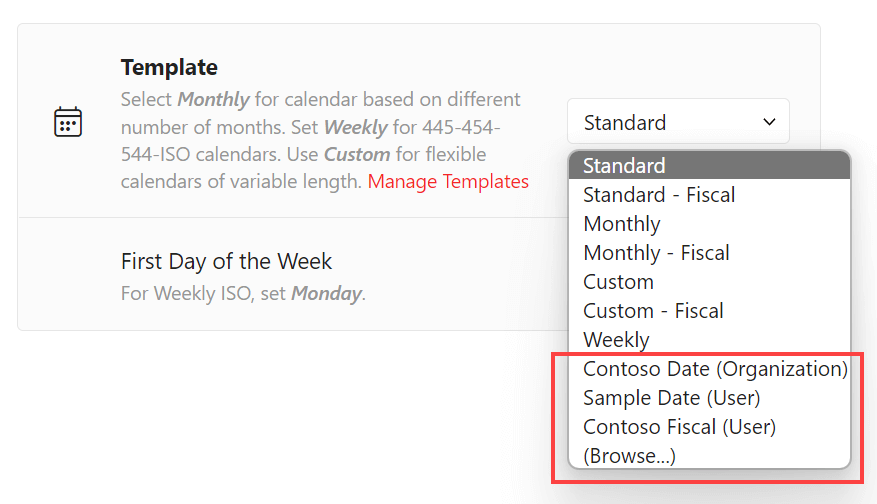
The Manage Dates feature in Bravo shows several predefined templates, followed by custom templates that can be defined at the organization level or at the user level. However, you can just load a specific template file by using the Browse menu item. The following picture highlights the custom templates installed on a Bravo instance and the final Browse menu item.
If there is a particular template you use frequently, you can manage the user templates displayed in the template list by using the Options / Templates dialog box.

This dialog box is also the starting point to create a new template. A Date template is a set of JSON files that instruct Bravo to create a Date table and the time intelligence measures for that Date table.
From a user perspective, the entire template is distributed through a single template package file – a single JSON file that combines all the required configurations for the Date table, holidays, and time intelligence measures.
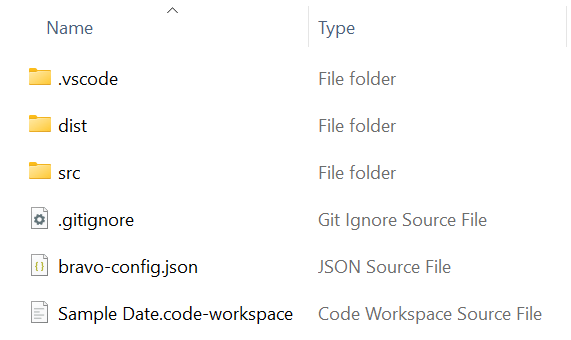
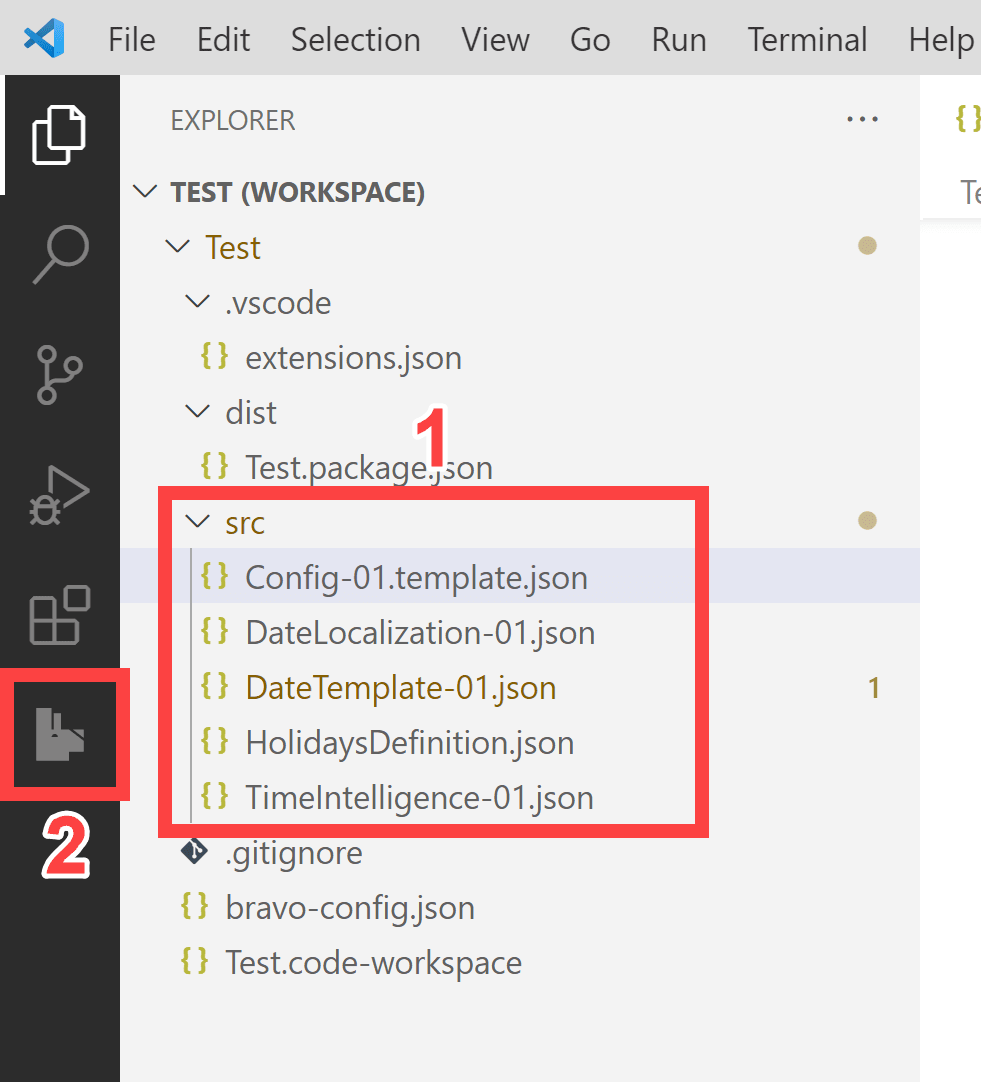
From a developer perspective, a template is a set of JSON files stored in a template workspace, an entire folder hierarchy identified by a file with the extension .code-workspace. Every user template listed in the Options / Templates dialog box corresponds to a folder containing all the template files. For example, by opening the folder of the Sample Date template, we see the following content.
The src folder contains the source files of the template. The content of these files is described in the Dax Template documentation. Typically, for a calendar template, we have the following JSON files:
- Config.template.json: Includes the global configuration of the template and the list of underlying template modules used.
- DateTemplate.json: Defines the template to create the Date table.
- TimeIntelligence.json: Defines the template to create the time intelligence measures.
- HolidaysDefinition.json: Defines the rules to create holidays in the Date table.
- DateLocalization.json: Resources for translations into different languages.
The dist folder contains a single template package file. This is the Date template file that can be provided to a Bravo user to consume the template. This template is automatically updated when you edit the template by using the Bravo Template Editor for Visual Studio Code described later on. If you used another editor to edit the JSON file, you would not obtain an automatic update of the package file in the dist folder.
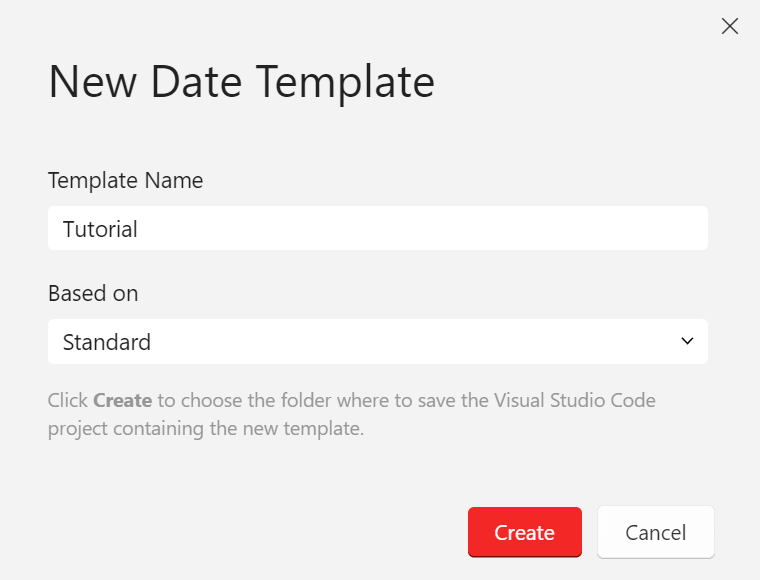
The New Template button in the Options / Templates dialog box creates a new template workspace by copying an existing template (Based on) and providing a new name (Template Name). Bravo stores the template in a new folder with the same template name. The new folder is created in the folder selected when you click the Create button.
Bravo creates the new template by copying all the original template files into the new template workspace. The next step is to open the template using Visual Studio Code with the Bravo Template Editor extension: the dialog box provides the link to download and install these tools.
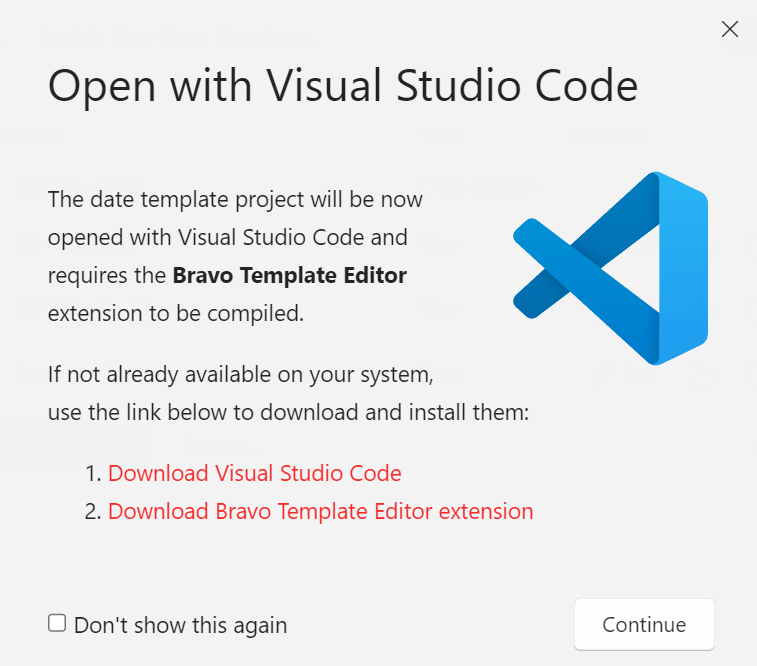
Visual Studio Code is a free, open-source editor provided by Microsoft. The Bravo Template Editor extension must be installed after you have installed Visual Studio Code. This extension is a free, open-source project available on the Bravo Template Editor GitHub repository. You should install these tools before moving forward with the template customization.
Introducing Bravo Template Editor for Visual Studio Code
The Bravo Template Editor extension for Visual Studio provides two important features to enable you to author a template:
- Generates the template package from the template workspace whenever a file is saved in the src folder. The template package file is the “redistributable” file that contains the entire template in a non-editable form. You must copy the entire workspace folder if you want to edit the template on another computer.
- Shows a preview of the template result by using Bravo connected to an instance of Power BI Desktop with a model compatible with the template. If you use Visual Studio without an instance of Bravo open, you cannot see a preview of the template result. This preview makes the authoring experience more productive because you catch errors in the template early on during development.
When you edit a template starting from Bravo, the connection to Bravo is automatically established and Visual Studio Code shows the entire content of the workspace. However, only the files in the src folder – highlighted as (1) in the following screenshot – should be modified in Visual Studio Code: the other files are used internally and should never be manually modified.
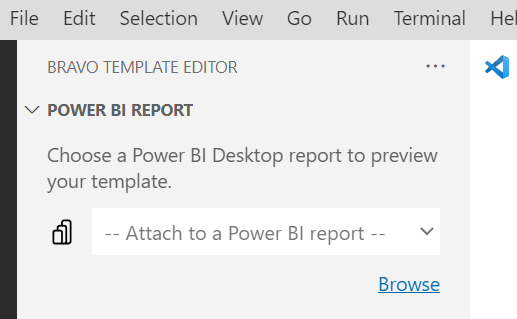
Button (2) in the screenshot above opens the Bravo Template Editor pane; this shows the connection to the Power BI report and a preview of the model changes if the template was applied to the connected Power BI Desktop model. After you open Visual Studio Code, use this pane to attach the Bravo Template Editor to a running instance of Power BI Desktop or open an existing PBIX file using Browse. The selected file becomes the model used to test the preview of the edited template.
Once you have selected the Power BI Desktop model to use, in the Model Changes Preview section you can see a list of all the objects the template would generate. The list is a preview, so the selected model does not change. If you can see the preview, the template is valid and can generate the objects displayed if used in Bravo.
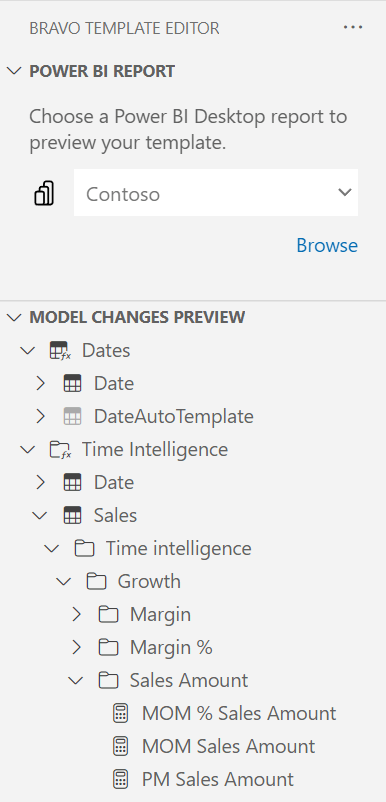
By selecting one of the tables of measures displayed in the preview, you can see in other windows a preview of the DAX generated and, only for the tables, a preview of the data generated for the selected table.
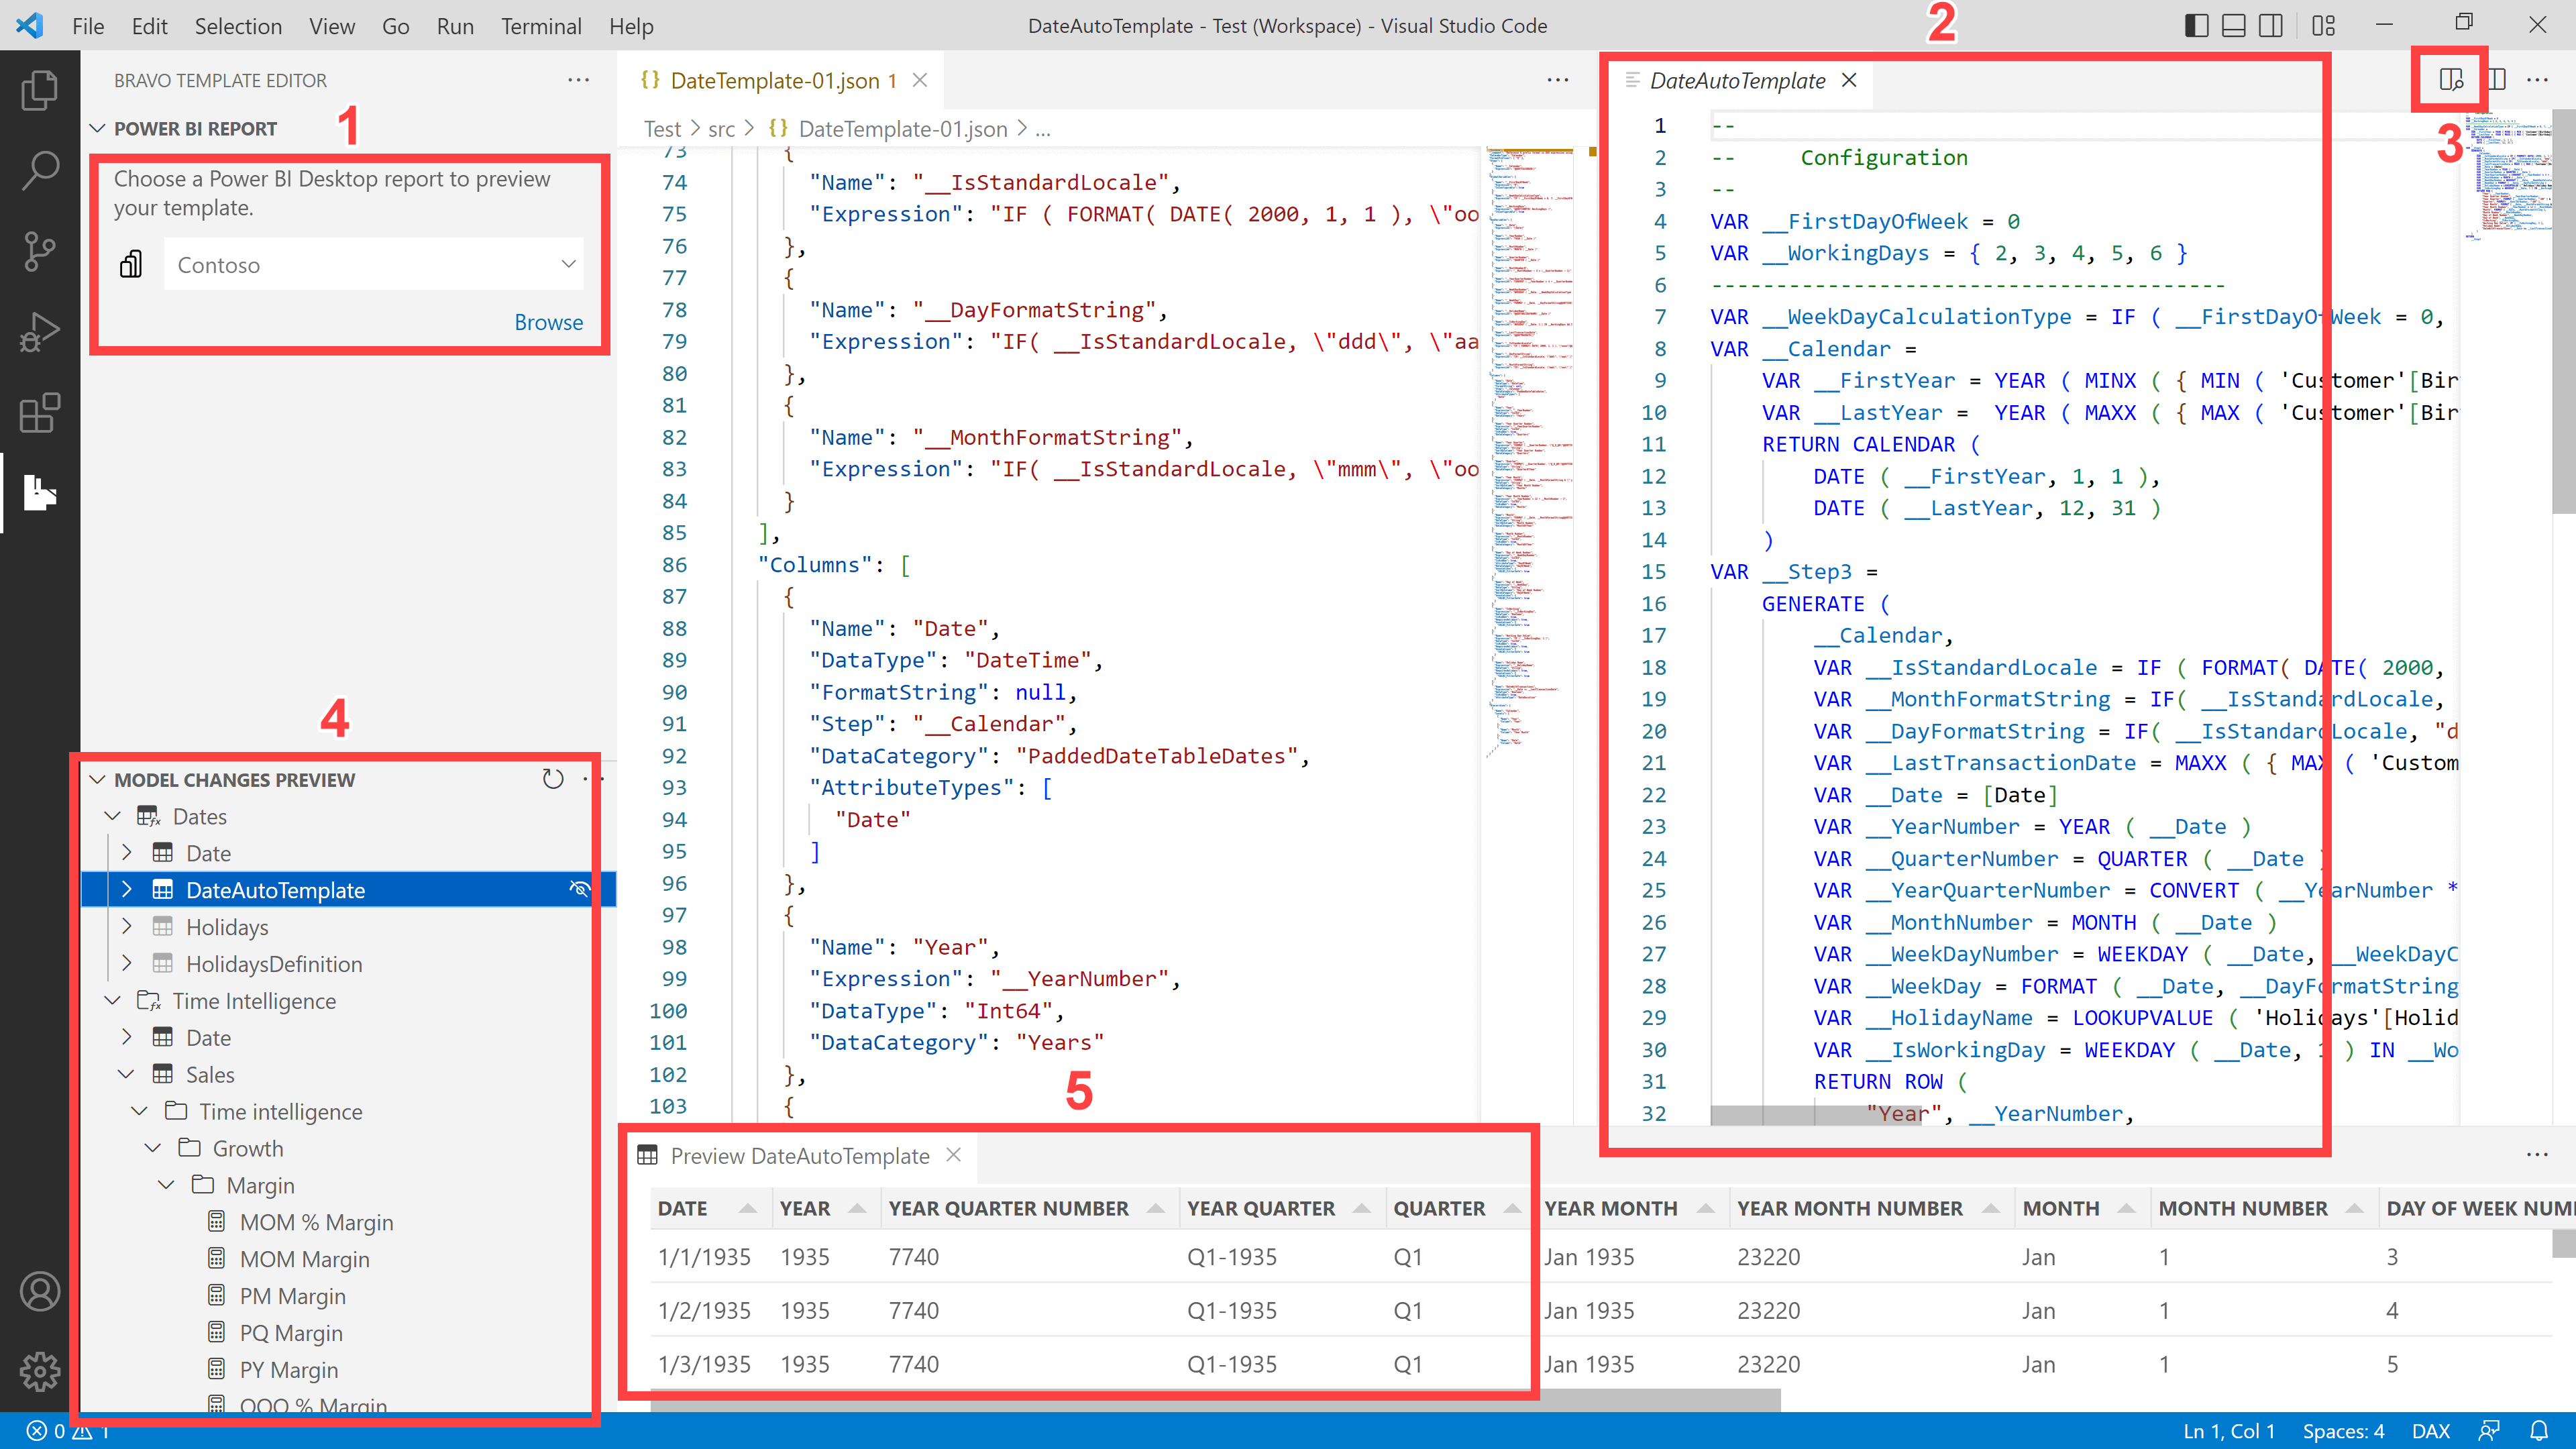
The areas highlighted in the previous screenshots are the following:
- The Power BI Report pane shows (and allows you to change) the Power BI Desktop instance used to preview the template result.
- Shows a preview of the DAX code generated for the Date table selected in (4), which is the DateAutoTemplate table in this case.
- Opens the Preview Data window (5) showing the content preview of a table generated by the template and selected in the Model Changes Preview
- Shows tables and measures created by the template. By you clicking on an object, the corresponding preview windows are automatically updated unless they are pinned in Visual Studio Code. A new window is created when a different object is selected.
- Shows a preview of the table content generated by the template. If you select a measure in (4), the data preview still shows the content of the last table selected.
At this point, you can start modifying the JSON files in the src folder. Remember that the preview windows are updated every time you save a file. Therefore, you can apply multiple changes without updating the preview, and see the result once you complete a batch of changes by saving the files.
To understand the meaning of the files in a template, use the available Dax Template documentation for the template files:
- DateTemplate.json: Refer to the Custom Date Table and Custom Template Table documentation to add, change, or remove columns from the Date table generated by the template.
- TimeIntelligence.json: Refer to the Measures Template documentation to add, change, or remove measure templates for the time intelligence calculations.
- Config.template.json: Refer to the Configuration documentation to add or remove files from the template and to change the default parameters. You can use this section to enforce parameters that should not be asked from the user consuming the template. You also have access to parameters that are not exposed by the Bravo user interface.
- HolidaysDefinition.json: Refer to the Holidays Definition Table documentation to add, change, or remove holidays from the definition list. This file can help you add holidays for specific administrative levels, such as state or city. If you modify existing countries or add new ones, please share your edits in the Bravo repository so that these improvements can be part of future Bravo releases.
- DateLocalization.json: Bravo provides translated definitions in several languages stored in this file. The schema used by this file is available in the Translation Definition documentation. If you fix errors for existing languages or add new ones, please share your edits in the Bravo repository so that these improvements can be part of future Bravo releases.
Watch the video embedded in this article to see a longer walkthrough example where we modify an existing template.
Conclusions
Bravo for Power BI can increase your productivity when creating a standard Date table for your model. The Bravo Template Editor provides a productive environment to create new templates to obtain customized Date tables and time intelligence measures. If you want to standardize a Date table for all the models in a company, creating a custom template for Bravo enables all the company users to apply the same Date table to all the models, saving tremendous amounts of time without requiring advanced skills.